Blog 4: Project Development
- nicholasleejh05
- Feb 26, 2025
- 12 min read
Hello and welcome back to my blog! Many things happened and I am going to share with you more about my journey in the past few weeks, but first recap time!
In my previous blog, I mainly talked about what Design of Experiments was and how useful the tool was. I also went through on how to use Design of Experiments by doing the assignment. In this blog, it is going to be all about project development but first, let me explain what chemical device my group is making. Let's jump right into it!
Our Chemical Device
You might be wondering, what chemical device did my group choose? Our group decided to make an automated plant watering system! Now you might be wondering, why did our group choose this from all things? It sounds like an easy solution to such a simple problem. However, many plant owners still struggle to keep their plants healthy. According to BetterPlanter, 50% of houseplant owners failed to meet the bare minimum which is forgetting water their plants! Hence, our automated plant watering system helps to solve this problem by watering the plant when there is not enough water in the soil. Additionally, this also helps to promote healthier plants while providing convenience for plant owners. It's a win-win situation for everyone!
Our chemical device features gears, Arduino programming, moisture sensor and submersible pump to help tackle this issue. Additionally, we ensures that the materials used were cheap so that you can build your very own automated plant watering system! The figure below is our final 2D sketch that has evolved throughout our journey!


With that, let's move onto the next section of the blog! Yay!
Team Planning, Allocation and Execution
In this section of the blog, I will introduce my team and our roles and responsibilities!! I have cool teammates!

I am Nicholas, the Chief Executive Officer (CEO) of the team! I am in charge of ensuring that our team stay on track throughout the project and ensured that our work is up to standards! Lastly, I ensured that all the objectives are met! Let's move onto our next member! Woooo!

<--------THAT'S ME!!!
(Yes, I know it's an ugly photo but it's funny)
This is Zhi Ling, the Chief Safety Officer (CSO) of the team! She is in charge of ensuring that any tasks done by this group was under safe conditions! She also ensured that the product we created was safe to use as well! Who is the next member?!

This is Hasnain, the CFO (Chief Financial Officer) of the team! He is in charge of ensuring that our group stayed within the budget of the group project by purchasing the materials! Now onto our final member!

This is Kynan, the COO (Chief Operations Officer) of the team! He is in charge of ensuring that we are meeting our deadlines by executing the tasks! With that.....
Together we are AQUAUTOMATE!!!! The name was inspired by aqua which is water and automate from automation!! Creative right? Here's a group photo of us chilling :)

Now that I have introduce the team to you, let's move onto the next section of the blog which is the Bills Of Materials (BOM). A BOM is a list of materials required to build the product. Some key points to take of in a BOM are the quantity, supplier link, unit price and the unit of measurement! It doesn't seem much but BOM plays a crucial role which ensures that we do not exceed our budget! For this project, we only had a 100 dollar budget, so we have to fully make good use of every cent possible! Our team searched for the cheapest supplier and our final costs came down to $67.14! Our finalized BOM is as shown down below.

With the BOM completed, we had to create a Gantt chart. Brings me back to the days when I had to do Design Of Technology. It was so stressful trying to meet the deadlines that was planned in the Gantt Chart. To simplify, a Gantt chart is a chart in which a series of horizontal lines show the amount of work done or production completed in certain periods of time in relation to the amount planned for those periods. It is really useful as it allows us to know if we are on track. In order to create a good BOM, one must know what key activities are required in making our product. For example, whether there is a need for 3D printing or laser cutting! The second important step is to know how much time is required to do that tasks. This step is very important as you certainly do not want to underestimate it as it can have severe consequences! Lastly, it is important to allocate the tasks and everyone has to play a part to make this successful! I will show my group's finalized Gantt Chart down below.

Now that we have completed the Gantt Chart and allocated everyone's tasks, it's time to move onto the next part of the blog!
Design and Build Process
It's time for the juicy part of the blog!! It's time to build our chemical device!! It's so fun yet so tiring at the same time. Before we start building the chemical device, we first have to understand the specification table of it! We also need to understand how the chemical device would function as well! These are actually the first few steps to building the chemical device and it is way before the final sketch and BOM! Since our product is based on watering the plant when there is no water in the soil, the water moisture must first measure the content before transferring the information to the CPU. The CPU then transmit information to the pump to dispense the water for us! Hence the flowchart would look similar to this down below.

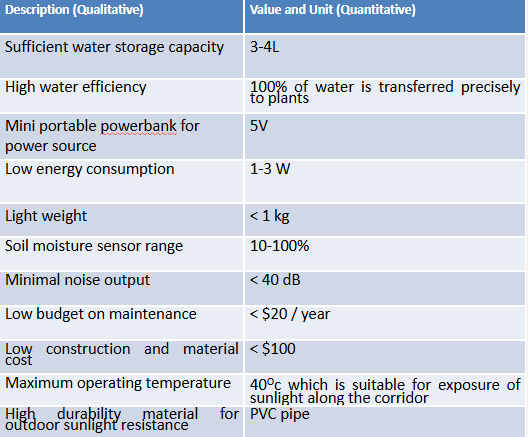
Afterwards, we need to understand the product specification table. A product specification table is a document that presents detailed information about a product's features and technical details. As it is a water automatic plant watering system, what details do you think are important? Some common details are the dimensions or the weight of the product! The product specification table is shown down below.
Once we have our product specification table, we have to brainstorm ideas on each features in the product as shown below!

Next, we have to come out with 5 chemical devices with different designs using the morphological chart above! We had to pick one design from each category and here is one chemical device idea that we chose as our "final" design!

With the layout created, it's time to draw out our chemical device!

This was originally supposed to be our final chemical device. However, there were some problems that we encountered through our journey. With the design in our mind, it's time to create our product!

The first step of creating our chemical device is to layout the foundation. For this step, we needed to support our chemical device by using PVC pipes! For our product, we had to saw and file 2meter pipes into 30x30x30. Additionally, we also had to 3D print the gears at the same time to speed up our process! Lastly, we needed to start on the Arduino Programming so that we are able to finish on time!
Working very hard as shown on the right
--------->

The next step is to integrate all of the system such that it works together. In this stage, we connected the 3D printed parts and Arduino into our chemical device. Unfortunately I was not able to help as I was in a study trip. With that, we have our chemical device and it works as shown down below!
However, our final design looks completely different from our initial design? But why?

Firstly, we originally wanted to use a solenoid valve to control the flowrate of the chemical device. However, the main problem was that the 12V solenoid valve required external power source which made it less portable. Additionally, drilling a hole at the water tank may have resulted in a water leakage. On the other hand, a 5V submersible pump is smaller, lighter and required lesser power. Hence, making it more efficient and portable compared to a solenoid valve.

Secondly, we relocated the water tank from the top to the bottom. This is because the when the water tank is located at the top, the chemical device was not as stable which affected the portability. Additionally, the aesthetics was not very pleasant when the water tank was at the top of our chemical device. Hence, when the water tank is located below of the chemical device, it made it more compact, stable, portable and was able to cover wiring components effectively.

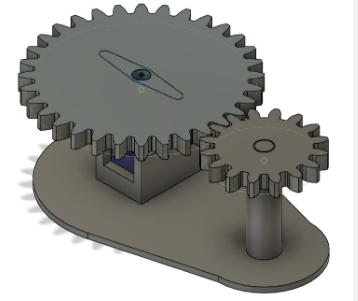
Thirdly, we decided to change the belt and pulley system into a gear pair for several reason. This is because a belt and pulley system is only effective when synchronization is required. Additionally, maintaining a gear pair is much simpler compared to a belt and pulley system. Hence, using a belt and pulley system is a waste of materials as the gear and pair would be sufficient for this chemical device.
Lastly, we added a moisture sensor cover to the moisture sensor to prevent water from damaging the moisture sensor.

My Contributions
My contributions to this assignment was mainly hands on as I have a weak foundation in Arduino and AutoCAD Fusion 360. Nevertheless, I still contributed as much as possible in the team. Firstly, I contributed to the team by helping to troubleshoot or improving the chemical device design. One example is recommending to replace the belt and pulley system with a gear pair for a more efficient design. I also recommended to add a moisture sensor cover to the moisture sensor which helps to prevent water damages. I have also created the AutoCAD Fusion 360 design as well as printed the design for the water moisture sensor cover. I have also contributed by cutting and filing the PVC pipes as the rest were doing Arduino Programming and designing the gear. Lastly, I contributed to the group project by finishing the presentation slides.
Problems and Solutions
However, our journey was not as smooth sailing as expected. There were many difficulties faced when we were building our chemical device even though we had changed our design. It was truly painful trying to overcome these challengers as we did not expect it.
Soldering
One of the first problem we encountered was that none of us in the team knew how to solder and we couldn't avoided it due to our submersible pump. To solve this problem, our instincts headed directly to the internet where there are many resources for almost every problem in existence. In this case, we used YouTube as it has many tutorials on how to solder. Additionally, we also seek help from one of the Technical Executive to help us. Here is one video that helped us learn how to solder!
Submersible pump
The second problem we encountered when building our chemical device was that our pump was not functioning as intended. It would not turn on even though we changed the wiring. Additionally, we also tested different ways of troubleshooting it such as changing the wiring or programming. Hence, to determine if it was the wiring or programming fault, we used a buzzer. We can deduce whether the pump is not functioning by swapping it with a buzzer. When the buzzer made noise, we knew that it was due to hardware failure and not software. Hence, we used another pump to solve this problem.
Gear mechanism design
The last key problem we faced when building the chemical device is the gear mechanism design. Initially, none of us had any prior experience designing the gear. Hence, we decided to source a design from YouTube videos and came out with our first design below.

Even though the gears could turn, there were some problems behind it, The first problem was the gear alignment between the small and big gear as shown above where the bigger gear is slightly taller than the small one. The second problem was that the gear did not turn as smoothly as expected due to gear meshing. Thirdly, the servo motor was not able to fit into the big gear through the small hole. lastly, the plant was not able to fit rest on the gear nicely. Hence, we decided to create a second design as shown down below.
To solve the gear meshing issue, we decided to increase the distance between the two gears such that it would now be smoother. We also increased the height of the small gear so that they are aligned. Additionally, we decided to relocate the servo motor at the bottom to increase the stability. However, this design was still far from perfect, this is because the servo motor was not able to fit into the big gear through the small hole. and the plant was not able to rest on the gear nicely. As a result, we went back to the drawing board to brainstorm how to fix the two other problems.

With the two out of fourth problems solved, we can modify the second design and came out with a design as shown above. To solve the issue of allowing the servo motor to be connected to the gear, we decided to cut a hole such that the servo arm will rest nicely in between. By doing so, it allows easy removal of servo arms and prevents the need for glue. We also tried to solve the issue of allowing the plant to rest by adding small blocks onto the gear but it did not work. Hence, we came out with another design to fully fix all of the problems.

To solve the problem of not allowing the plant to rest nicely on the gears, we decided to add a circular block that will be glued on the plant. It works similarly to microwave plates! Interesting and cool right? Hence, this design mechanism design has helped us solved the several issues that we originally faced which are gear meshing, gear alignment, fitting the servo motor and lastly, allowing the plant to fit into the gear.
Now that you have understood what problems my team faced and how we solved them, let's move onto the next part of the blog!
Downloadable Files
I have included all of the necessary files (AutoCAD Fusion 360, Arduino Programming etc) required to print this design for yourself by clicking this link -----> ClickHere
Pretty cool design right?
Personal Reflection Journal
Wow, time past by so fast! We are unfortunately at the end of my CPDD journey. It has been a long journey doing both ICPD and CPDD. My experience of CPDD was challenging but it provided a great opportunity for me to grow and improve.
The first thing that I noticed was ICPD was much easier compared to CPDD. This was because ICPD was mainly focused on theory knowledge while CPDD focused on the practical aspects instead. Applying theoretical knowledge to practical design is more complex than expected. This was because there were so many things that went wrong during the making of the chemical device. Firstly, I thought that the chemical device design that our group came up with was perfect. However, that came out to be false as CPDD has put both our technical and practical skills to the test. One example is utilizing the gear mechanism from practical 1 such that the gear would turn 360 degrees. Additionally, we had to also ensure that the servo motor and plant was able to fit into the gear which took a lot of redesigning and prototyping.
The second thing that I noticed was that teamwork plays a huge role in group projects. Initially for CA1, our group was full of energy and was able to finish the assignment with excellent quality. I put in my best effort into the group project which are clearly evident from the drawings etc. However, the quality of work for CA2 was not up to my standards and I am part of the problem as well. I felt that I did not put in as much effort as I did in CA1 due to the overload in assignments in the second term. But these are excuses for me not putting enough effort into group projects as if others can do it, why can't I? So what now? Now what is left is to reflect on my actions and improve in my final year project where I will be working in the same team again. But what do I need to improve on? The main thing I definitely need to improve on is my time management skills, I have to balance between studies and leisure time by setting up a schedule and a to do list. By doing so, I will be able to consistently put in my best effort while having adequate rest.
The last thing that I have learned in my CPDD journey is that there should be a balance. I have always believed that in a team, we should choose tasks that align with our strengths, even if they are challenging. For example, if I’m not strong in programming, someone more skilled should take on that role, while I contribute in areas where I excel. This way, we can work more efficiently and support each other by covering weaknesses. However, while this may be generally true, there are downsides to it as true growth happens only through overcoming hardships. It is important for team membranes to grow and learn new skills. This is because if everyone always stick to what they are already good at, it limit personal and team development. There must be a good balance to assign tasks based on strengths while also providing opportunities for growth.
The End
As we move to the end of my chemical product design journey, I have learned many different things from gear ratios to design of experiments. I hope that you enjoy the previous blogs that I have put my heart and soul into and I had a lot of fun making these blogs. it's time to say my final goodbye! With that, it is time to wrap my fourth blog on my chemical product design and development journey. I hope you have a great time reading and see you next time. Bye bye! :)


Comments