Blog 1: Gears
- nicholasleejh05
- Nov 17, 2024
- 9 min read
Hello! Did you miss me? It's has been 3 months since my last blog back in August 8 and time really do fly!

For those who are new here, I am Nicholas, a Year 2 Chemical Engineering student at Singapore Polytechnic. This website was originally created to share my journey in Introduction to Chemical Product Design and I was not expecting to be writing another blog afterwards. However, I am thrilled to announce that I will be writing another 4 more blogs (including this one) as I had a lot of fun sharing my experience even though it took quite some time to write. For the next few blogs that I am writing, I will be going to share my journey in Chemical Product Design and Development and with that, lets get right into it! ⬆️ That's me and yes thumbs up 👍
Learning Goals
Similar to what I wrote for my first blog, in order to enhance myself to become better, I have several goals that I hope to achieve before completing this module. I will be writing down and explaining how I would know when I achieve these goals down below.
First Goal: I want to improve on my Arduino programming skills
To achieve this goal, I will practice on my Arduino programming skills during my free time and search for tutorials on the Internet, such as YouTube to understand how the code works.
I will know I have achieved this goal when I successfully create a chemical product that incorporates Arduino programming and integrates various mechanisms.
Second Goal: I want to improve on my hands on skills
To achieve this goal, I will practice using different tools and equipment during the practical lesson so that I am more familiarized.
I will know I have achieved this goal when I am confident that the chemical product I created works as intended.
Now that you know what are my learning goals are, lets move on to the juicy part of the blog!
Gears
I recently attended a practical lesson on gears which initially surprised me as I didn't see how it was related to my course at all. It felt like I went to the wrong class because since when were gears part of chemical engineering?? This question sparked my curiosity and enthusiasm. Additionally, I am glad I had the opportunity to attend this practical lesson as I got to learn new things! I also realized why we were taught gears at the end of this practical lesson and with that, let's move on to the next part of the blog!
I had the same reaction as the cat ⬆️
What is a Gear??

So, what is a gear? A gear is a mechanical component with teeth that mesh with another gear to transmit mechanical force, torque, and motion. It is an essential mechanism that plays a vital role in our daily lives! Gears comes in all kinds of design and shapes, each serving different unique purposes in the mechanism world. Some examples are shown in the picture on the left. Although some gears look similar such as spur and helical gears, they both have different pros and cons! Spur gears are more efficient than helical gears when transmitting power due to their simplistic design. However, spur gears are nosier than helical gears because their teeth engage all at once which generates more vibrations and noise!
Definitions and relationships
Now that you have understood the basics of gears, let's dive deeper into the technical aspect. we will only focus on spur gears as they are the simplest. Additionally, we will focus on three technical details of gear module, pitch circular diameter and the number teeth.

Gear module (m): It refers to the size of the gear teeth. The unit for module is mm. The larger a module number, the larger the size of the teeth. Gears that mesh together are having the same module.

Pitch circular diameter (PCD): It refers to the imaginary circle that passes through the contact point between two meshing gears. It represents the diameters of two friction rollers in contact and moves at the same linear velocity.

Total number of teeth (z): The number of teeth is the total number of individual teeth which are the protrusions that extend outward from the pitch circle of a gear. For example, the total number of teeth for the gear on the left would be 10.
Now that you have understood the definitions, how do they relate together? There is a formula down below which shows how all three are linked together. Isn't physics amazing and I always wondered how physicist came up with this formulas!

Looking at this equation might seem confusing at first but if the equation is flipped into PCD = m x z, it would be much easier to understand! This is because if the number of teeth or gear module increases, the pitch circular diameter must increase! Hence, this formula is right! Now, how do we combine equations of two gears into one? Since the gear modules of two gears is the same, we can combine the equation together like this.

Yay, you have learnt the basics of gears and their equations! Let's move onto the next part!
Gear Ratio
You may be wondering, what is a gear ratio? A gear ratio represents the number of revolutions the driven gear will rotate for each revolution of the driver gear. But wait, what's the difference between driver and driven gear? The driver gear is the source of power of rotation whereas the driven gear is turned by the driver gear. Now, how do we determine the gear ratios? There are many different ways!
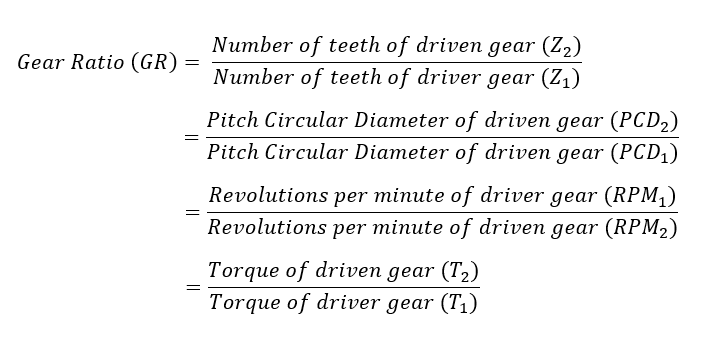
As you can see from the picture above, there are many ways to calculate the gear ratio which is a dream for us engineers! I did not mentioned earlier but torque is the turning force and not speed. Additionally, they are different as shown above, they are inversely proportional! Using this knowledge, a higher torque would result in a lower speed.
To summaries everything together:
High gear ratio (Torque multiplier GR > 1):
Higher torque as force is equal for both driver and driven gears at the point of intersection. Since torque = force x radius, the driven gear will have a higher torque due to a larger radii.
Lower speed as the driver gear must rotate faster in order to match the same distance covered by the driven gear.
Driver gear is smaller than the driven gear
Low gear ratio (Speed multiplier GR < 1):
Lower torque as force is equal for both driver and driven gears at the point of intersection. Since torque = force x radius, the driven gear will have a lower torque due to a smaller radii.
Higher speed as the driven gear must rotate faster in order to match the same distance covered by the driver gear.
Driver gear is bigger than the driven gear
As shown above, there is a trade off between high gear ratio and low gear ratios. Hence, it is important to decide the gear ratio based on the application. For example, if you would want a lift a heavy object, it is recommended to use a higher gear ratio as you would have the torque mechanical advantage. However, if you want to achieve a higher top speed, it is recommended to use a lower gear ratio due to the speed multiplier. Now that you have understood the difference, it's time to move onto the practical!! Yay!!!
Hand Powered Fan

Time for the fun part! For this section of the practical, we had to design a hand powered fan using the materials as show on the right. Before we began, we placed some rules so that we created the best fan possible.
Minimal effort is required to turn the fan.
The fan must rotate very fast so that the there is maximum airflow.
Using this two clues, it's obvious to use a low gear ratio as it is a speed multiplier. Hence, this means that the driver gear must be the biggest and driven gear is the smallest!
Eventually, this is what our group have came up as shown on the left which has the lowest gear ratio.

This means that for every rotations of the driver gear would result in 10 rotations of the driven gear!
Using the hand-powered fan was fun as it is cool to see what my team created works. Additionally, the fan works as stated in the objective which is to create a hand-powered fan that creates maximum airflow with minimum effort. Here's a video on our hand-powered fan! ----->
Improvements

After using the hand-powered fan for some time, I found that there was a major flaw about it. The problem was that if the linkage mechanism was in the middle or horizontal as shown on the left, it would be very difficult to push the handle. Hence, this hand-powered fan design is not very good. I took the matters into my own hands and came up with an improved design. By removing the linkage mechanism and replacing it with a rack and pinon, It solves the problem as shown in the video below. This design ensures that the lever can be pushed without any problem compared to the design on the left. Additionally, the gear ratio will not be affected while minimal effort is required.
Wow, we are done with the first activity of the practical! let's move onto the next activity!
Lifting water using gears

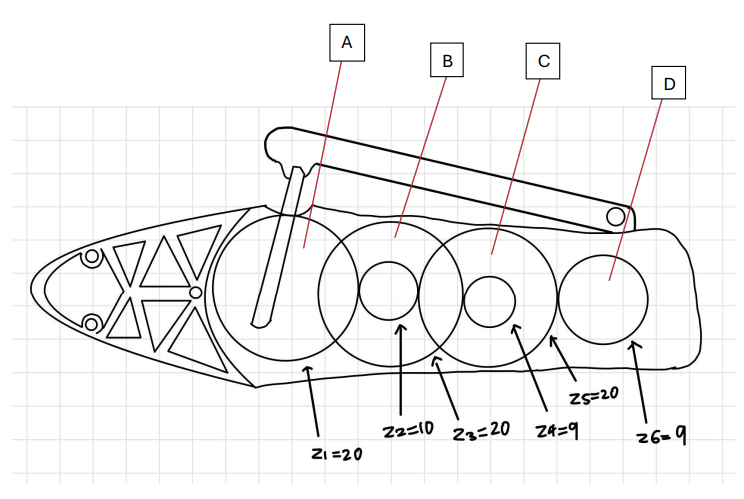
For this section of the practical, we had to lift a water bottle by 200mm with minimum force required. For this activity the gear ratio have the be largest which means the driver gears need to be the smallest gear while the driven gear needs to be the biggest gear. Sounds easy right? Well not exactly when it involves multiple gears which are shown on the right.

Eventually our setup came to look like this which our gear ratio came up to 26.7! The calculations is shown down below.


With this gear ratio, it will be much easier to calculate the amount of rotations required from the driver gears to rotate the driven gears!

After calculating the number of revolutions for crank handle, it is time to test the actual number of revolutions required!
As shown in the video above, it took 51 revolutions to rotate the crank handle to move the bottle 200mm from the ground. Even though the answer we calculated was around 54 revolutions which is about the same as the actual value. The theoretical answer that our team calculated is wrong and it's because it should be less than the actual value due to mechanical efficiency as some of the energy is lost because of frictional loss. However, there are some reasons why our theoretical value is higher than the actual and how we should have prevented it.
The rope at the winch was uneven so the measurements were not accurate. To prevent this, we should have even the rope as much as possible before doing the testing.
The measurements used the average diameter of the winch initially and the end. However, as the diameter of the winch increases with each wind, the number of revolutions required decreases. This means that the effective diameter increases.
Our team estimated the distance the bottle will be lifted up which led to the decrease in our theoretical number of revolutions required. Our team should have calculated the distance that the water bottle was lifted up using a ruler as it is much more accurate compared to using the eyes.
Hence, these is why I believe that it is important to conduct the experiment a few times to eliminate human errors or other factors in place to obtain a more reliable result. With that, we have come to an end to our practical lesson. Yippee!!! I had a lot of fun doing this practical!
Reflections
It's time for reflections! So back to the question on why I think this practical was conducted. "Am I in the wrong class? Since when was gears related to Chemical Engineering??" I personally believe that apart from needing this knowledge for our projects, I also believe that it was done for us to step out of our comfort zone for us to grow. This practical lesson showed me that engineers are always in the tough situation and we need to come out with creative solutions. Additionally, these solutions sometimes involves trial and error for example activity 2.
Moving forward, even though I think my team did well for this practical lesson, I think that there are always room for improvement. For example, I think we could have conducted activity 2 which was lifting the water several times to eliminate human errors and other factors. However, I am also proud of my team as we communicated together and decided to split the team into two such that we can complete the assignment on time. Additionally, we also voice out any problems we had during the practical lesson to ensure that we were not held back.
In terms of personal growth, I think that there are room for improvement. For example, I would be the one thinking solutions for activity 2. I should trust my teammates more often as they can also provide me with better solutions since two brains is better than one. To improve on my performance, I should ask for other people's opinion as well as not hog the item.
Lastly, I enjoyed the practical lesson as I got to learn more about gear mechanism and their applications. For example, using a higher gear ratio would help to lift a heavy load with minimal effort. Additionally, the practical lesson challenges me to apply both technical skills and theory. I also learn that practical work involves revisiting topics and reapplying them again. Overall. this practical lesson has helped me identify ways to improve on myself.
The End
With that, it is time to wrap my first blog on chemical product design and development. I had an amazing time learning about gears. I hope you have a great time reading and not to worry there are more coming soon. But for now, see you next time. Bye bye!
References
Adams, J. (2018). Different Types of Gears and Their Uses | Classification of Gears. [online] Pinterest. Available at: https://www.pinterest.com/pin/classification-of-gears-12-types-and-applications--12736811439544563/ [Accessed 17 Nov. 2024].
KHK Gears. (2015). Basic Gear Terminology and Calculation | KHK Gears. [online] Available at: https://khkgears.net/new/gear_knowledge/abcs_of_gears-b/basic_gear_terminology_calculation.html. [Accessed 17 Nov. 2024].
하비연 Hobbyeon [Craft] (2021). Making a hand fan without motor and battery. [online] YouTube. Available at: https://www.youtube.com/watch?v=sflxH8zXA4Y. [Accessed 17 Nov. 2024]


Comments